Angular 20.1.0: What's new
Native Browser Powers Meet Angular: Fetch API Integration, Live Signal Graphs, and the Complete Developer Experience Transformation.
🔥 @angular/core
1. New destroyed Property on DestroyRef (#61849)
Angular 20.1.0 adds a destroyed property to DestroyRef that lets you check if a component is already destroyed before registering cleanup callbacks, preventing runtime errors.
import { Component, inject, signal, ChangeDetectionStrategy } from '@angular/core';
import { DestroyRef } from '@angular/core';

@Component({
  selector: 'app-safe-cleanup',
  template: `
    <div class="cleanup">
      <p>Status: {{ status() }}</p>
      <button
        type="button"
        (click)="handleAsyncOperation()"
        [disabled]="loading()">
        Start Operation
      </button>
    </div>
  `,
  changeDetection: ChangeDetectionStrategy.OnPush
})
export class SafeCleanupComponent {
  private readonly _destroyRef = inject(DestroyRef);

  loading = signal(false);
  status = signal('Ready');

  handleAsyncOperation(): void {
    this.loading.set(true);

    setTimeout(() => {
      // Check before registering cleanup
      if (!this._destroyRef.destroyed) {
        this._destroyRef.onDestroy(() => {
          console.log('Cleanup executed');
        });

        this.loading.set(false);
        this.status.set('Completed');
      }
    }, 2000);
  }
}2. TestBed: New Bindings Support 🧪 (#62040)
Angular's TestBed.createComponent() now supports direct component bindings, eliminating the need for wrapper components in tests.
interface TestComponentOptions {
  bindings?: Binding[];
}

TestBed.createComponent<T>(
  component: Type<T>,
  options?: TestComponentOptions
): ComponentFixture<T>

// Examples
it('should bind to inputs', () => {
  const value = signal(10);
  const fixture = TestBed.createComponent(MyComponent, {
    bindings: [inputBinding('value', value)]
  });

  fixture.detectChanges();
  expect(fixture.componentInstance.value).toBe(10);

  value.set(20); // Reactive updates work!
  fixture.detectChanges();
  expect(fixture.componentInstance.value).toBe(20);
});

it('should bind to outputs', () => {
  let clickCount = 0;
  const fixture = TestBed.createComponent(MyComponent, {
    bindings: [outputBinding('click', () => clickCount++)]
  });

  // Trigger component event
  fixture.componentInstance.click.emit();
  expect(clickCount).toBe(1);
});

it('should support two-way binding', () => {
  const value = signal('initial');
  const fixture = TestBed.createComponent(MyComponent, {
    bindings: [twoWayBinding('value', value)]
  });

  // Changes propagate both ways automatically
  value.set('updated');
  fixture.detectChanges();
  expect(fixture.componentInstance.value).toBe('updated');
});
3. Add destroyed property to EnvironmentInjector - PR
Ever wondered if that dynamically created EnvironmentInjector is still alive? Angular's latest enhancement adds a destroyed property to EnvironmentInjector, giving you the same lifecycle awareness that DestroyRef brought to components.
The Problem This Solves
When working with dynamic injectors (especially in complex applications with lazy loading or dynamic component creation), developers often faced a black box situation:
// Before: No way to know if injector is still valid
const dynamicInjector = createEnvironmentInjector([SomeService], parentInjector);
// Later in code... is this safe?
// 🤷♀️ Could throw if destroyed
const service = dynamicInjector.get(SomeService);
// After: Crystal clear lifecycle management
const dynamicInjector = createEnvironmentInjector([SomeService], parentInjector);
// Check if it's still alive
if (!dynamicInjector.destroyed) {
const service = dynamicInjector.get(SomeService); // ✅ Safe!
}
// Register cleanup callbacks
dynamicInjector.onDestroy(() => {
console.log('Injector is being destroyed!');
// Cleanup logic here
});🔥 @angular/common
1. NgOptimizedImage: New decoding Attribute Support (#61905)
Angular's NgOptimizedImage directive now supports the native HTML decoding attribute, giving developers control over image decoding behavior for better performance optimization.
@Input() decoding?: 'sync' | 'async' | 'auto';

<!-- Default behavior (auto) -->
<img ngSrc="hero.jpg" width="800" height="400">

<!-- Priority image (automatically gets sync) -->
<img ngSrc="hero.jpg" width="800" height="400" priority>

<!-- Custom decoding strategy -->
<img ngSrc="gallery.jpg" width="300" height="200" decoding="async">
Smart Defaults:
Default images:
decoding="auto"(browser decides)Priority images:
decoding="sync"(immediate decoding for faster LCP)Custom override: Developers can specify any valid value
2. NgComponentOutlet Just Learned Module Federation Magic - PR
Ever tried to dynamically load a component from a remote micro-frontend and watched it fail miserably because it couldn't find its services? That dependency injection nightmare just got solved.
NgComponentOutlet now supports a custom EnvironmentInjector input, making it a first-class citizen for Module Federation and micro-frontend architectures.
@Component({
  selector: 'tenant-dashboard',
  template: `
    <!-- Each tenant gets their own component with their own services -->
    <div *ngFor="let tenant of tenants">
      <ng-container
        *ngComponentOutlet="tenantComponent;
                            environmentInjector: tenant.injector;
                            inputs: { tenantId: tenant.id }">
      </ng-container>
    </div>
  `
})
export class MultiTenantDashboard {
  tenants: Array<{
    id: string;
    injector: EnvironmentInjector;
  }> = [];

  tenantComponent = TenantSpecificComponent;

  async loadTenant(tenantConfig: TenantConfig) {
    // Load tenant-specific module with its own services
    const tenantModule = await import(`./tenants/${tenantConfig.name}.module`);

    // ✅ Gets its own injection context!
    const tenantInjector = createEnvironmentInjector(
      tenantModule.providers,
      this.currentInjector
    );

    this.tenants.push({
      id: tenantConfig.id,
      injector: tenantInjector
    });
  }
}
🔥 @service-worker
1. Service Worker Notification Close Events (#61442)
Adds support for tracking when push notifications are closed or dismissed. Now you can react when users dismiss notifications, not just when they click them.
Before this feature, you could only track when users clicked notifications. Now you can also track when they dismiss them, giving you complete visibility into notification interactions.
2. Push Subscription Change Detection (#61856)
When browsers refresh or invalidate push subscriptions, your app can now react automatically to maintain reliable notifications.
Push subscriptions can change without user action:
Browser updates subscription keys
Security tokens expire and refresh
Network changes trigger re-registration
Browser maintenance invalidates old subscriptions
Previously, your app wouldn't know about these changes, causing push notifications to silently fail.
🔥 @angular/build
1. Customizable Code Coverage Reporters (PR)
Adds a codeCoverageReporters option to the experimental unit-test builder, allowing you to customize how test coverage results are generated and formatted.
Previously, you could only enable/disable code coverage. Now you can:
Choose specific output formats (HTML, LCOV, XML, etc.)
Generate multiple report formats simultaneously
Customize individual reporter options
Better integrate with CI/CD pipelines and external tools
This only works if you set codeCoverage option to true:
// angular.json - Basic Configuration
{
  "projects": {
    "my-app": {
      "architect": {
        "test": {
          "builder": "@angular/build:unit-test",
          "options": {
            "buildTarget": "my-app:build",
            "tsConfig": "tsconfig.spec.json",
            "runner": "vitest",
            "codeCoverage": true,
            "codeCoverageReporters": ["html", "lcov", "text-summary"]
          }
        }
      }
    }
  }
}

// Advanced Configuration with Custom Options
{
  "projects": {
    "my-app": {
      "architect": {
        "test": {
          "builder": "@angular/build:unit-test",
          "options": {
            "buildTarget": "my-app:build",
            "tsConfig": "tsconfig.spec.json",
            "runner": "vitest",
            "codeCoverage": true,
            "codeCoverageReporters": [
              "text-summary",
              ["html", { "subdir": "html-report" }],
              ["lcov", { "file": "lcov.info" }],
              ["cobertura", { "file": "cobertura.xml" }]
            ]
          }
        }
      }
    }
  }
}
Available Reporter Types
1. HTML Reporter
{
  "codeCoverageReporters": [
    ["html", {
      "subdir": "coverage-html",
      "skipEmpty": false
    }]
  ]
}Output: Interactive HTML report with detailed file-by-file coverage Best for: Local development, detailed analysis
2. LCOV Reporter
{
  "codeCoverageReporters": [
    ["lcov", {
      "file": "lcov.info",
      "projectRoot": "src/"
    }]
  ]
}Output: LCOV format compatible with many tools Best for: CI/CD integration, SonarQube, Codecov
3. Text Summary
{
  "codeCoverageReporters": ["text-summary"]
}Output: Console summary with overall percentages Best for: Quick CLI feedback
4. Cobertura XML
{
  "codeCoverageReporters": [
    ["cobertura", {
      "file": "cobertura-coverage.xml"
    }]
  ]
}Output: XML format for Jenkins, Azure DevOps Best for: Enterprise CI/CD systems
🔥 @angular/compiler
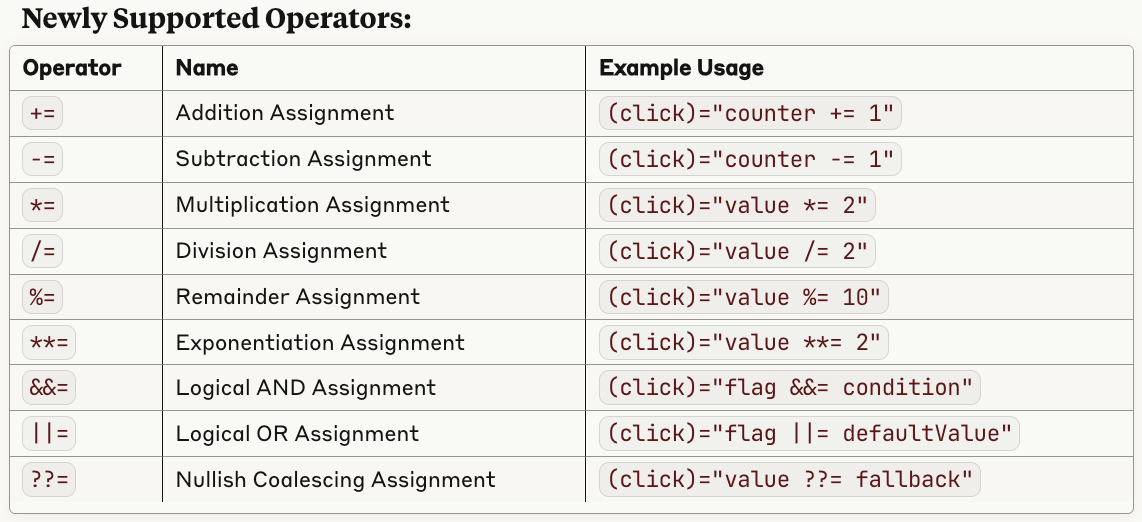
1. Enhanced Binary Assignment Operators in Templates - PR
Angular 20.1.0 will introduce expanded support for binary assignment operators in templates, bringing Angular's expression syntax closer to standard JavaScript and making template code more concise and intuitive.
<button (click)="counter += 1">Increment</button>
<button (click)="counter -= 1">Decrement</button>
<button (click)="value *= 2">Double</button>
🔥 @angular/common/http
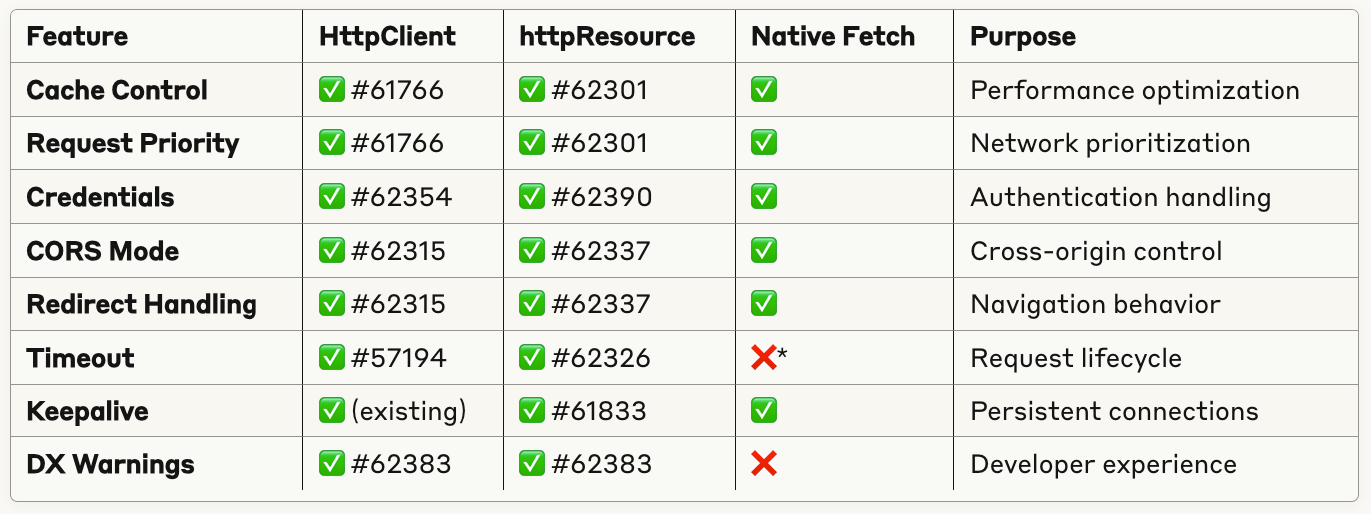
Both HttpClient and httpResource now expose key Fetch API options that were previously impossible to control.
🎯 What's New:
priority– Tell the browser which requests are critical vs backgroundcache– Control browser caching behavior (force-cache,no-store, etc.)credentials– Fine-tune cookie and authentication handlingtimeout– Built-in request timeouts (no more manual AbortController!)mode & redirect– Precise CORS and redirect controlkeepalive– Requests survive page navigation
// Before: Basic HTTP with limited control
this.http.get('/api/data');

// After: Browser-native performance tuning
this.http.get('/api/critical-data', {
  priority: 'high',        // 🏎️ VIP network treatment
  cache: 'force-cache',    // ⚡ Instant subsequent loads
  timeout: 2000,          // ⏱️ No hanging requests
  keepalive: true         // 🔄 Survives navigation
});

// Same powers in httpResource!
const data = httpResource(() => ({
  url: '/api/live-data',
  priority: 'auto',
  cache: 'no-store'       // Always fresh
}));
🏗️ The Complete Fetch Feature Matrix
*Timeout is an Angular addition - fetch doesn't have native timeout
This isn't just about adding features - it's about fundamentally upgrading Angular's HTTP layer to match modern web platform capabilities. Every single fetch API feature is now available in Angular, with the same ease of use developers expect.
The result: Angular applications can now achieve native browser performance for HTTP operations while maintaining Angular's developer experience and ecosystem benefits.
🔥 @language-service
1. add semantic tokens for templates - PR
Ever envied how JetBrains IDEs make Angular component tags pop with perfect syntax highlighting while VS Code treats them like regular HTML? That gap just closed.
Angular's Language Service now provides semantic tokens for templates, bringing contextual syntax highlighting that understands your code's meaning, not just its text patterns.
<!-- All tags look the same -->
<div>Regular HTML</div>
<app-user-card>Angular Component</app-user-card>
<button>Another HTML element</button>

<!-- Now with semantic awareness! -->
<div>Regular HTML</div>           <!-- HTML element color -->
<app-user-card>Component</app-user-card>  <!-- Class/component color -->
<button>HTML element</button>     <!-- HTML element color -->
2. Support to fix missing required inputs diagnostic - PR
Imagine typing <app-user-card></app-user-card> and VS Code immediately says: "Hey, you forgot the required user input. Want me to fix that?" That's exactly what just happened.
Angular's Language Service now provides intelligent quick fixes for missing required inputs, turning template errors into one-click solutions.
<!-- Before -->
<app-user-profile></app-user-profile>
!--  ~~~~~~~~~~~~~~~~ 🚨 Red squiggly line appears -->

<!-- After quick fix -->
<app-user-profile [user]=""></app-user-profile>
<!--                 ~~~~~~~~ ✨ Added automatically! -->
🔥 @angular/router
1. Run loadComponent and loadChildren functions in the route's injection context - PR
Ever tried using inject() inside a loadChildren or loadComponent function and hit this frustrating error?
// NG0203: inject() must be called from an injection context

// ❌ This would throw an error
{
  path: 'dashboard',
  loadComponent: () => {
    const config = inject(FeatureConfig); // 💥 NG0203 Error!
    return config.useAdvancedDashboard
      ? import('./advanced-dashboard.component')
      : import('./basic-dashboard.component');
  }
}

// ✅ This works perfectly!
{
  path: 'dashboard',
  loadComponent: () => {
    const config = inject(FeatureConfig); // 🎯 Works like magic!
    return config.useAdvancedDashboard
      ? import('./advanced-dashboard.component')
      : import('./basic-dashboard.component');
  }
}
Here is a good article with examples.
🔥 @angular/cli
1. MCP Server Implementation - PR
An initial experimental implementation of a Model Context Protocol (MCP) server is now available as a command within the Angular CLI.
Check out my post about the comprehensive guide to Angular MCP Server, including the latest best practices.
🔥 Angular Material (components)
1. CDK Drag-Drop Anchor Elements - cdk - PR
Adds cdkDropListHasAnchor to the CDK drag-drop module. This creates an "anchor" element that stays in the original position when dragging items between lists, perfect for copy operations.
Before: When dragging items between lists, the placeholder moves with the item, making it look like the item is being moved (not copied).
After: With anchor elements, the original position is preserved visually, making copy operations feel more natural.
import { Component, signal } from '@angular/core';
import { CdkDragDrop, moveItemInArray, copyArrayItem, CdkDrag, CdkDropList } from '@angular/cdk/drag-drop';

@Component({
  selector: 'app-shopping-cart',
  template: `
    <div class="shopping-container">
      <div class="shopping-container__section">
        <h3>Available Products</h3>

        <div
          cdkDropList
          [cdkDropListData]="products()"
          [cdkDropListConnectedTo]="[cartList]"
          cdkDropListSortingDisabled
          cdkDropListHasAnchor
          class="product-list"
          (cdkDropListDropped)="_handleProductDrop($event)">

          @for (product of products(); track product.id) {
            <div class="product-item" cdkDrag [cdkDragData]="product">
              <div class="product-item__info">
                <h4>{{ product.name }}</h4>
                <p class="product-item__price">\${{ product.price }}</p>
              </div>
              <div class="product-item__stock">
                Stock: {{ product.stock }}
              </div>
            </div>
          }
        </div>
      </div>

      <div class="shopping-container__section">
        <h3>Shopping Cart ({{ cartTotal() }} items)</h3>

        <div
          cdkDropList
          #cartList="cdkDropList"
          [cdkDropListData]="cart()"
          class="cart-list"
          (cdkDropListDropped)="_handleCartDrop($event)">

          @for (item of cart(); track item.id) {
            <div class="cart-item" cdkDrag>
              <div class="cart-item__info">
                <h4>{{ item.name }}</h4>
                <p class="cart-item__quantity">Qty: {{ item.quantity }}</p>
              </div>
              <div class="cart-item__total">
                \${{ (item.price * item.quantity).toFixed(2) }}
              </div>
              <button
                type="button"
                class="cart-item__remove"
                (click)="_removeFromCart(item.id)">
                ×
              </button>
            </div>
          }

          @if (cart().length === 0) {
            <div class="cart-list__empty">
              Drag products here to add to cart
            </div>
          }
        </div>

        @if (cart().length > 0) {
          <div class="cart-summary">
            <div class="cart-summary__total">
              Total: \${{ cartTotalPrice().toFixed(2) }}
            </div>
            <button
              type="button"
              class="cart-summary__checkout"
              (click)="_checkout()">
              Checkout
            </button>
          </div>
        }
      </div>
    </div>
  `,
  changeDetection: ChangeDetectionStrategy.OnPush
})
export class ShoppingCartComponent {
  products = signal([
    { id: 1, name: 'Wireless Headphones', price: 99.99, stock: 15 },
    { id: 2, name: 'Smartphone Case', price: 24.99, stock: 8 },
    { id: 3, name: 'USB-C Cable', price: 12.99, stock: 25 },
    { id: 4, name: 'Portable Charger', price: 49.99, stock: 12 },
    { id: 5, name: 'Bluetooth Speaker', price: 79.99, stock: 6 }
  ]);

  cart = signal<Array<{
    id: number;
    name: string;
    price: number;
    quantity: number;
  }>>([]);

  cartTotal = computed(() =>
    this.cart().reduce((sum, item) => sum + item.quantity, 0)
  );

  cartTotalPrice = computed(() =>
    this.cart().reduce((sum, item) => sum + (item.price * item.quantity), 0)
  );

  _handleProductDrop(event: CdkDragDrop<any[]>): void {
    // Products can only be copied to cart, not rearranged
    if (event.previousContainer !== event.container) {
      const product = event.previousContainer.data[event.previousIndex];
      this._addToCart(product);
    }
  }

  _handleCartDrop(event: CdkDragDrop<any[]>): void {
    if (event.previousContainer === event.container) {
      // Reorder items in cart
      const cartItems = [...this.cart()];
      moveItemInArray(cartItems, event.previousIndex, event.currentIndex);
      this.cart.set(cartItems);
    } else {
      // Add product from product list
      const product = event.previousContainer.data[event.previousIndex];
      this._addToCart(product);
    }
  }

  _addToCart(product: any): void {
    const currentCart = [...this.cart()];
    const existingItem = currentCart.find(item => item.id === product.id);

    if (existingItem) {
      existingItem.quantity += 1;
    } else {
      currentCart.push({
        id: product.id,
        name: product.name,
        price: product.price,
        quantity: 1
      });
    }

    this.cart.set(currentCart);
  }

  _removeFromCart(productId: number): void {
    this.cart.update(cart => cart.filter(item => item.id !== productId));
  }

  _checkout(): void {
    console.log('Checkout with items:', this.cart());
    // Reset cart after checkout
    this.cart.set([]);
  }
}
This feature significantly improves the UX for copy-based drag-and-drop interactions, making it clear that items remain in their original location.
2. Material Chips Edit Icon - material - PR
adds an optional edit icon to Material Design chips using the matChipEdit directive. This makes editable chips much more discoverable and user-friendly.
Before: Users had to double-click or focus+Enter to edit chips - not very discoverable.
After: Clear visual edit button shows that chips are editable and provides direct interaction.
// Before: Only double-click editing (hidden functionality)
<mat-chip-row [editable]="true">{{ tag.name }}</mat-chip-row>

// After: Visible edit button (discoverable functionality)
<mat-chip-row [editable]="true">
  <button matChipEdit>
    <mat-icon>edit</mat-icon>
  </button>
  {{ tag.name }}
</mat-chip-row>🔍 Experimental Signal & Effects Graph in DevTools
Angular 20.1 introduces live signal dependency visualization right in your browser! This experimental feature lets you see your reactive signal graph in real-time as your app runs.
🎯 How to Enable:
Open Angular DevTools
Click the gear icon ⚙️
Toggle "Enable Signals & Effects Graph"
👀 What You'll See:
Each signal and effect appears as a labeled box showing:
Name and current value
Dependency arrows connecting related signals
Color coding by type:
🔵 Regular signals (blue)
🟢 Computed signals (green)
🔴 Linked signals (red)
⚫ Effects (dark gray)
// Now you can visually see this dependency chain:
const count = signal(0);                    // 🔵 Blue box
const doubled = computed(() => count() * 2); // 🟢 Green box (arrow from count)
const effect = effect(() => {               // ⚫ Gray box (arrow from doubled)
  console.log('Doubled:', doubled());
});
Check this video from Igor Sedov.
Thanks for reading so far 🙏
I’d like to have your feedback so please leave a comment, clap or follow. 👏
Spread the Angular love! 💜
If you really liked it, share it among your community, tech bros and whoever you want! 🚀👥
Don't forget to follow me and stay updated: 📱
Thanks for being part of this Angular journey! 👋😁


